یک موتور شطرنج هوش مصنوعی خودبازی از ابتدا با آموزش تقلید ایجاد کنید
این مقاله ای در مورد چگونگی ایجاد یک موتور شطرنج هوش مصنوعی است که کاملاً از ابتدا شروع کردم تا موتور شطرنج هوش مصنوعی خودم را ساختم.
از آنجا که ایجاد یک موتور شطرنج هوش مصنوعی از ابتدا یک کار نسبتاً پیچیده است، این مقاله طولانی خواهد بود، اما با ما همراه باشید، زیرا محصولی که در نهایت با آن مواجه خواهید شد، پروژه جالبی برای نمایش خواهد بود!
پیش نیازها
این مقاله بیشتر مفاهیم را با جزئیات توضیح خواهد داد. با این حال، برخی از پیش نیازهای توصیه شده برای دنبال کردن این آموزش وجود دارد. شما باید با موارد زیر آشنا باشید:
پایتون
نحوه استفاده از ترمینال
نوت بوک ژوپیتر
مفاهیم اساسی هوش مصنوعی
قوانین شطرنج
از ابزارهای زیر نیز استفاده خواهم کرد:
پایتون
بسته های مختلف پایتون
استاک ماهی
فهرست مطالب
بخش ۱: چگونه یک مجموعه داده تولید کنیم
در این بخش، من از Stockfish برای ایجاد مجموعه داده بزرگی از حرکات از موقعیت های مختلف استفاده خواهم کرد. این دادهها میتوانند بعداً برای آموزش هوش مصنوعی شطرنج استفاده شوند.
چگونه Stockfish را دانلود کنیم
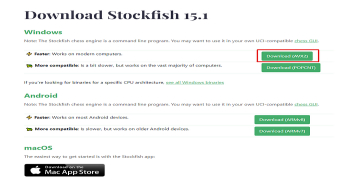
مهمترین جزء موتور شطرنج من Stockfish است، پس به شما نحوه نصب آن را نشان خواهم داد.
به صفحه دانلود وب سایت Stockfish بروید و نسخه را برای شما دانلود کنید. من خودم از ویندوز استفاده می کنم، پس نسخه ویندوز (سریعتر) را انتخاب کردم:

پس از دانلود، فایل فشرده را در هر مکانی از رایانه شخصی خود که می خواهید موتور شطرنج شما باشد، استخراج کنید. به خاطر داشته باشید که آن را در کجا قرار می دهید زیرا برای مرحله بعدی به مسیر نیاز دارید.
نحوه ترکیب Stockfish با پایتون
اکنون باید موتور را نیز در پایتون قرار دهید. شما میتوانید این کار را به صورت دستی انجام دهید، اما من استفاده از بسته Python Stockfish را آسانتر دیدم زیرا تمام عملکردهای مورد نیاز را دارد.
ابتدا بسته را از pip (ترجیحا در محیط مجازی خود) نصب کنید:
pip install stockfishسپس می توانید آن را با استفاده از دستور زیر وارد کنید:
from stockfish import Stockfish stockfish = Stockfish(path=r"C:\Users\eivin\Documents\ownProgrammingProjects18062023\ChessEngine\stockfish\stockfish\stockfish-windows-2022-x86-64-avx2")توجه داشته باشید که باید مسیر خود را به فایل اجرایی Stockfish بدهید:

می توانید مسیر فایل را از ساختار پوشه کپی کنید، یا اگر در ویندوز ۱۱ هستید، می توانید ctrl + shift + c را فشار دهید تا مسیر فایل به طور خودکار کپی شود.
عالی! اکنون Stockfish را در پایتون در دسترس دارید!
نحوه تولید مجموعه داده
اکنون به یک مجموعه داده نیاز دارید تا بتوانید موتور شطرنج هوش مصنوعی را آموزش دهید! شما می توانید این کار را با وادار کردن Stockfish به بازی و یادآوری هر موقعیت و حرکاتی که می توانید از آنجا انجام دهید انجام دهید.
از آنجایی که Stockfish یک موتور قوی شطرنج است، این حرکات در امتداد بهترین حرکات ممکن خواهد بود.
ابتدا یک بسته شطرنج و NumPy را نصب کنید (مقدارهای زیادی برای انتخاب وجود دارد، اما من از مورد زیر استفاده خواهم کرد).
هر خط را (به صورت جداگانه) در ترمینال وارد کنید:
pip install chess pip install numpyسپس بستهها را وارد کنید (به یاد داشته باشید همانطور که قبلاً در این مقاله نشان داده شد، Stockfish را نیز وارد کنید):
import chess import random from pprint import pprint import numpy as np import os import glob import timeشما همچنین به برخی از توابع کمکی در اینجا نیاز دارید:
#helper functions: def checkEndCondition(board): if (board.is_checkmate() or board.is_stalemate() or board.is_insufficient_material() or board.can_claim_threefold_repetition() or board.can_claim_fifty_moves() or board.can_claim_draw()): return True return False #save def findNextIdx(): files = (glob.glob(r"C:\Users\eivin\Documents\ownProgrammingProjects18062023\ChessEngine\data\*.npy")) if (len(files) == 0): return 1 #if no files, return 1 highestIdx = 0 for f in files: file = f currIdx = file.split("movesAndPositions")[-1].split(".npy")[0] highestIdx = max(highestIdx, int(currIdx)) return int(highestIdx)+1 def saveData(moves, positions): moves = np.array(moves).reshape(-1, 1) positions = np.array(positions).reshape(-1,1) movesAndPositions = np.concatenate((moves, positions), axis = 1) nextIdx = findNextIdx() np.save(f"data/movesAndPositions{nextIdx}.npy", movesAndPositions) print("Saved successfully") def runGame(numMoves, filename = "movesAndPositions1.npy"): """run a game you stored""" testing = np.load(f"data/{filename}") moves = testing[:, 0] if (numMoves > len(moves)): print("Must enter a lower number of moves than maximum game length. Game length here is: ", len(moves)) return testBoard = chess.Board() for i in range(numMoves): move = moves[i] testBoard.push_san(move) return testBoard به یاد داشته باشید که مسیر فایل را در تابع findNextIdx تغییر دهید، زیرا این برای رایانه شما شخصی است.
یک پوشه داده در پوشه ای که کدنویسی می کنید ایجاد کنید و مسیر را کپی کنید (اما همچنان *.npy را در پایان نگه دارید)
تابع checkEndCondition از توابع بسته Chess pip برای تحلیل اینکه آیا بازی قرار است به پایان برسد استفاده می کند.
تابع saveData یک بازی را در فایلهای npy ذخیره میکند که روشی بسیار بهینه برای ذخیره آرایهها است.
این تابع از تابع findNextIdx برای ذخیره در یک فایل جدید استفاده می کند (به خاطر داشته باشید که در اینجا یک پوشه جدید به نام data برای ذخیره تمام داده ها ایجاد کنید).
در نهایت، تابع runGame باعث میشود تا بتوانید بازیای را که ذخیره کردهاید اجرا کنید تا موقعیتهای بعد از numMoves تعداد حرکتها را تحلیل کنید.
سپس می توانید در نهایت به عملکردی که بازی های شطرنج را استخراج می کند برسید:
def mineGames(numGames : int): """mines numGames games of moves""" MAX_MOVES = 500 #don't continue games after this number for i in range(numGames): currentGameMoves = [] currentGamePositions = [] board = chess.Board() stockfish.set_position([]) for i in range(MAX_MOVES): #randomly choose from those 3 moves moves = stockfish.get_top_moves(3) #if less than 3 moves available, choose first one, if none available, exit if (len(moves) == 0): print("game is over") break elif (len(moves) == 1): move = moves[0]["Move"] elif (len(moves) == 2): move = random.choices(moves, weights=(80, 20), k=1)[0]["Move"] else: move = random.choices(moves, weights=(80, 15, 5), k=1)[0]["Move"] currentGamePositions.append(stockfish.get_fen_position()) board.push_san(move) currentGameMoves.append(move) stockfish.set_position(currentGameMoves) if (checkEndCondition(board)): print("game is over") break saveData(currentGameMoves, currentGamePositions)در اینجا شما ابتدا یک حداکثر حد تعیین می کنید تا یک بازی بی نهایت طول نکشد.
سپس، تعداد بازیهایی را که میخواهید اجرا کنید اجرا میکنید و مطمئن میشوید که هم Stockfish و هم بسته Chess pip به موقعیت شروع بازنشانی شدهاند.
در مرحله بعد، ۳ حرکت برتر پیشنهاد شده توسط Stockfish را دریافت می کنید و یکی از آنها را برای بازی انتخاب می کنید (۸۰٪ تغییر برای بهترین حرکت، ۱۵٪ تغییر برای دومین حرکت برتر، ۵٪ تغییر برای سومین حرکت برتر). دلیل اینکه شما همیشه بهترین حرکت را انتخاب نمی کنید این است که انتخاب حرکت تصادفی تر باشد.
سپس، یک حرکت را انتخاب میکنید (حتی اگر کمتر از سه حرکت احتمالی وجود داشته باشد هیچ خطایی رخ نمیدهد)، موقعیت تخته را با استفاده از FEN (روشی برای رمزگذاری موقعیت شطرنج) و همچنین حرکت انجام شده از آن موقعیت را ذخیره میکنید.
اگر بازی تمام شد، حلقه را شکسته و تمام موقعیت ها و حرکات انجام شده از آن موقعیت ها را ذخیره می کنید. اگر بازی تمام نشد، تا پایان بازی به انجام حرکات ادامه دهید.
سپس می توانید یک بازی را با این موارد استخراج کنید:
mineGames(1)به یاد داشته باشید که در اینجا یک پوشه داده ایجاد کنید، زیرا این جایی است که من بازی ها را ذخیره می کنم!
چگونه یک بازی ماین شده را تحلیل کنیم
تابع mineGames را برای استخراج یک بازی با استفاده از دستور زیر اجرا کنید:
mineGames(1)با استفاده از دستور زیر می توانید با یک تابع کمکی که قبلا نشان داده شده بود به این بازی دسترسی پیدا کنید:
testBoard = runGame(12, "movesAndPositions1.npy") testBoardبا فرض وجود ۱۲ حرکت در بازی، چیزی شبیه به این خواهید دید:

و بس، اکنون میتوانید هر تعداد بازی را که میخواهید استخراج کنید.
مدتی طول می کشد و پتانسیل هایی برای بهینه سازی این فرآیند استخراج وجود دارد، مانند موازی سازی شبیه سازی های بازی (زیرا هر بازی کاملاً از دیگری جدا است).
برای کد کامل قسمت ۱، می توانید کد کامل را در GitHub من تحلیل کنید.
بخش ۲: نحوه رمزگذاری داده ها
در این قسمت شما حرکات و موقعیت های شطرنج را به همان روشی که DeepMind با AlphaZero انجام داد رمزگذاری می کنید!
من از داده هایی که در قسمت ۱ این مجموعه جمع آوری کردید استفاده خواهم کرد.
به عنوان یادآوری، شما Stockfish را نصب کردید و مطمئن شدید که می توانید به آن در رایانه دسترسی داشته باشید. سپس آن را وادار کردید علیه خودش بازی کند، در حالی که تمام حرکات و موقعیت ها را ذخیره می کردید.
شما اکنون یک مشکل یادگیری نظارت شده دارید، زیرا ورودی موقعیت فعلی است و برچسب (حرکت صحیح از موقعیت ها) حرکتی است که Stockfish تصمیم گرفت بهترین حرکت است.
نحوه نصب و وارد کردن بسته ها
ابتدا باید تمام بسته های مورد نیاز را نصب و وارد کنید، که اگر قسمت ۱ این مجموعه را دنبال کرده باشید، ممکن است برخی از آنها را قبلا داشته باشید.
همه واردات در زیر آمده است - به یاد داشته باشید هنگام نصب از طریق pip هر بار فقط یک خط وارد کنید:
pip install numpy pip install gym-chess pip install chess علاوه بر این، از زمانی که np.int استفاده شده است، باید یک تغییر کوچک در یکی از فایل های بسته gym-chess ایجاد کنید که اکنون منسوخ شده است.
در فایلی با مسیر نسبی (از محیط مجازی) venv\Lib\site-packages\gym_chess\alphazero\board_encoding.py که venv نام محیط مجازی من است، باید "np.int" را جستجو کرده و جایگزین کنید. آنها را با "int".
اگر این کار را نکنید، یک پیام خطایی خواهید دید که نشان می دهد np.int منسوخ شده است.
من همچنین مجبور شدم VS Code را پس از جایگزینی "np.int" با "int" دوباره راه اندازی کنم تا کار کند.
تمام وارداتی که نیاز دارید در زیر آمده است:
import numpy as np import gym import chess import os import gym.spaces from gym_chess.alphazero.move_encoding import utils, queenmoves, knightmoves, underpromotions from typing import Listو سپس شما همچنین باید محیط ورزشگاه را برای رمزگذاری و رمزگشایی حرکات ایجاد کنید:
env = gym.make('ChessAlphaZero-v0')نحوه کدگذاری موقعیت ها و حرکات تخته
رمزگذاری یک عنصر مهم در هوش مصنوعی است، زیرا به ما امکان می دهد مشکلات را به روشی قابل خواندن برای هوش مصنوعی نشان دهیم.
به جای تصویری از یک صفحه شطرنج، یا رشته ای که یک حرکت شطرنج مانند "d2d4" را نشان می دهد، در عوض با استفاده از آرایه ها (فهرست اعداد) آن را نشان می دهید.
پیدا کردن نحوه انجام این کار به صورت دستی بسیار چالش برانگیز است، اما خوشبختانه برای ما، بسته Gym-chess Python قبلاً این مشکل را برای ما حل کرده است.
من قصد ندارم وارد جزئیات بیشتر در مورد نحوه کدگذاری آنها شوم، اما میتوانید با استفاده از کد زیر ببینید که یک موقعیت با یک آرایه شکل (۸،۸،۱۱۹) نشان داده میشود، و تمام حرکات ممکن با یک آرایه (۴۶۷۲) ارائه میشوند. (۱ ستون با ۴۶۷۲ مقدار).
اگر میخواهید در این مورد بیشتر بخوانید، میتوانید مقاله AlphaZero را تحلیل کنید، اگرچه این مقاله کاملاً پیچیدهای برای درک کامل است.
#code to print action and state space env = gym.make('ChessAlphaZero-v0') env.reset() print(env.observation_space) print(env.action_space)کدام خروجی ها:

همچنین می توانید رمزگذاری یک حرکت را تحلیل کنید. از نماد رشته تا نماد رمزگذاری شده. اطمینان حاصل کنید که محیط را بازنشانی کنید زیرا ممکن است خطا بدهد اگر این کار را نکنید:
#first set the environment and make sure to reset the positions env = gym.make('ChessAlphaZero-v0') env.reset() #encoding the move e2 to e4 move = chess.Move.from_uci('e2e4') print(env.encode(move)) # -> outputs: 877 #decoding the encoded move 877 print(env.decode(877)) # -> outputs: Move.from_uci('e2e4')با استفاده از این، اکنون می توانید توابعی برای رمزگذاری حرکات و موقعیت هایی که از قسمت ۱ ذخیره کرده اید، در جایی که یک مجموعه داده را ایجاد کرده اید، داشته باشید.
نحوه ایجاد توابع برای رمزگذاری حرکات
این توابع از بسته Gym-Chess کپی شده اند، اما با ترفندهای کوچک، پس به یک کلاس وابسته نیست.
من به صورت دستی این توابع را تغییر دادم تا رمزگذاری آسان تر باشد. من در مورد درک کامل این توابع نگران نباشم، زیرا آنها بسیار پیچیده هستند.
فقط بدانید که آنها راهی هستند برای اطمینان از اینکه حرکت هایی که انسان ها می فهمند، به روشی تبدیل می شوند که رایانه ها می توانند درک کنند.
#fixing encoding funcs from openai def encodeKnight(move: chess.Move): _NUM_TYPES: int = 8 #: Starting point of knight moves in last dimension of 8 x 8 x 73 action array. _TYPE_OFFSET: int = 56 #: Set of possible directions for a knight move, encoded as #: (delta rank, delta square). _DIRECTIONS = utils.IndexedTuple( (+2, +1), (+1, +2), (-1, +2), (-2, +1), (-2, -1), (-1, -2), (+1, -2), (+2, -1), ) from_rank, from_file, to_rank, to_file = utils.unpack(move) delta = (to_rank - from_rank, to_file - from_file) is_knight_move = delta in _DIRECTIONS if not is_knight_move: return None knight_move_type = _DIRECTIONS.index(delta) move_type = _TYPE_OFFSET + knight_move_type action = np.ravel_multi_index( multi_index=((from_rank, from_file, move_type)), dims=(8, 8, 73) ) return action def encodeQueen(move: chess.Move): _NUM_TYPES: int = 56 # = 8 directions * 7 squares max. distance _DIRECTIONS = utils.IndexedTuple( (+1, 0), (+1, +1), ( 0, +1), (-1, +1), (-1, 0), (-1, -1), ( 0, -1), (+1, -1), ) from_rank, from_file, to_rank, to_file = utils.unpack(move) delta = (to_rank - from_rank, to_file - from_file) is_horizontal = delta[0] == 0 is_vertical = delta[1] == 0 is_diagonal = abs(delta[0]) == abs(delta[1]) is_queen_move_promotion = move.promotion in (chess.QUEEN, None) is_queen_move = ( (is_horizontal or is_vertical or is_diagonal) and is_queen_move_promotion ) if not is_queen_move: return None direction = tuple(np.sign(delta)) distance = np.max(np.abs(delta)) direction_idx = _DIRECTIONS.index(direction) distance_idx = distance - 1 move_type = np.ravel_multi_index( multi_index=([direction_idx, distance_idx]), dims=(8,7) ) action = np.ravel_multi_index( multi_index=((from_rank, from_file, move_type)), dims=(8, 8, 73) ) return action def encodeUnder(move): _NUM_TYPES: int = 9 # = 3 directions * 3 piece types (see below) _TYPE_OFFSET: int = 64 _DIRECTIONS = utils.IndexedTuple( -1, 0, +1, ) _PROMOTIONS = utils.IndexedTuple( chess.KNIGHT, chess.BISHOP, chess.ROOK, ) from_rank, from_file, to_rank, to_file = utils.unpack(move) is_underpromotion = ( move.promotion in _PROMOTIONS and from_rank == 6 and to_rank == 7 ) if not is_underpromotion: return None delta_file = to_file - from_file direction_idx = _DIRECTIONS.index(delta_file) promotion_idx = _PROMOTIONS.index(move.promotion) underpromotion_type = np.ravel_multi_index( multi_index=([direction_idx, promotion_idx]), dims=(3,3) ) move_type = _TYPE_OFFSET + underpromotion_type action = np.ravel_multi_index( multi_index=((from_rank, from_file, move_type)), dims=(8, 8, 73) ) return action def encodeMove(move: str, board) -> int: move = chess.Move.from_uci(move) if board.turn == chess.BLACK: move = utils.rotate(move) action = encodeQueen(move) if action is None: action = encodeKnight(move) if action is None: action = encodeUnder(move) if action is None: raise ValueError(f"{move} is not a valid move") return actionپس اکنون می توانید یک حرکت را به عنوان یک رشته (به عنوان مثال: "e2e4" برای حرکت از e2 به e4) بدهید و یک عدد (نسخه کدگذاری شده حرکت) را خروجی می دهد.
چگونه یک تابع برای رمزگذاری موقعیت ها ایجاد کنیم
رمزگذاری موقعیت ها کمی دشوارتر است. من تابعی را از بسته gym-chess ("encodeBoard") گرفتم زیرا در استفاده مستقیم از بسته مشکلاتی داشتم. تابعی که کپی کردم در زیر است:
def encodeBoard(board: chess.Board) -> np.array: """Converts a board to numpy array representation.""" array = np.zeros((8, 8, 14), dtype=int) for square, piece in board.piece_map().items(): rank, file = chess.square_rank(square), chess.square_file(square) piece_type, color = piece.piece_type, piece.color # The first six planes encode the pieces of the active player, # the following six those of the active player's opponent. Since # this class always stores boards oriented towards the white player, # White is considered to be the active player here. offset = 0 if color == chess.WHITE else 6 # Chess enumerates piece types beginning with one, which you have # to account for idx = piece_type - 1 array[rank, file, idx + offset] = 1 # Repetition counters array[:, :, 12] = board.is_repetition(2) array[:, :, 13] = board.is_repetition(3) return array def encodeBoardFromFen(fen: str) -> np.array: board = chess.Board(fen) return encodeBoard(board) من همچنین تابع encodeBoardFromFen را اضافه کردم، زیرا تابع کپی شده نیاز به یک صفحه شطرنج دارد که با استفاده از بسته Python Chess نمایش داده می شود، پس ابتدا از FEN-notation (روشی برای رمزگذاری موقعیت های شطرنج به یک رشته - نمی توانید از آن استفاده کنید زیرا به رمزگذاری نیاز دارید). به اعداد) به صفحه شطرنج داده شده در آن بسته.
سپس تمام آنچه را که برای رمزگذاری تمام فایل های خود نیاز دارید در اختیار دارید.
نحوه خودکار کردن رمزگذاری برای تمام فایل های داده خام
اکنون که میتوانید حرکتها و موقعیتها را رمزگذاری کنید، این فرآیند را برای همه فایلهای موجود در پوشه خود که از قسمت ۱ این سری تولید کردهاید، خودکار خواهید کرد. این شامل یافتن تمام فایل هایی است که باید داده ها را در آنها رمزگذاری کنید و آنها را در فایل های جدید ذخیره کنید.
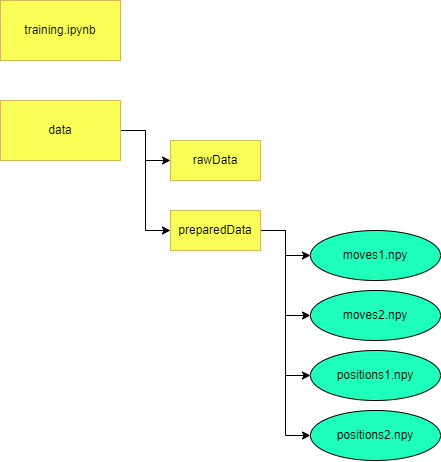
توجه داشته باشید که از قسمت ۱ ساختار پوشه را کمی تغییر دادم.
من اکنون یک پوشه والد Data دارم، و در داخل این پوشه، rawData را دارم، که حرکت ها در قالب رشته و موقعیت ها در قالب FEN (از قسمت ۱) است.
من همچنین پوشه preparedData را در زیر پوشه داده دارم، جایی که حرکات و موقعیت های کدگذاری شده ذخیره می شوند.
توجه داشته باشید که حرکت ها و موقعیت های کدگذاری شده در فایل های جداگانه ذخیره می شوند زیرا رمزگذاری ها دارای ابعاد متفاوتی هستند.

#function to encode all moves and positions from rawData folder def encodeAllMovesAndPositions(): board = chess.Board() #this is used to change whose turn it is so that the encoding works board.turn = False #set turn to black first, changed on first run #find all files in folder: files = os.listdir('data/rawData') for idx, f in enumerate(files): movesAndPositions = np.load(f'data/rawData/{f}', allow_pickle=True) moves = movesAndPositions[:,0] positions = movesAndPositions[:,1] encodedMoves = [] encodedPositions = [] for i in range(len(moves)): board.turn = (not board.turn) #swap turns try: encodedMoves.append(encodeMove(moves[i], board)) encodedPositions.append(encodeBoardFromFen(positions[i])) except: try: board.turn = (not board.turn) #change turn, since you skip moves sometimes, you might need to change turn encodedMoves.append(encodeMove(moves[i], board)) encodedPositions.append(encodeBoardFromFen(positions[i])) except: print(f'error in file: {f}') print("Turn: ", board.turn) print(moves[i]) print(positions[i]) print(i) break np.save(f'data/preparedData/moves{idx}', np.array(encodedMoves)) np.save(f'data/preparedData/positions{idx}', np.array(encodedPositions)) encodeAllMovesAndPositions() #NOTE: shape of files: #moves: (number of moves in gamew) #positions: (number of moves in game, 8, 8, 14) (number of moves in game is including both black and white moves)من ابتدا محیط را ایجاد می کنم و آن را ریست می کنم.
سپس، من تمام فایل های داده خام ساخته شده از قسمت ۱ را باز می کنم و آن را رمزگذاری می کنم. من همچنین این کار را در دستور try/catch انجام می دهم، زیرا گاهی اوقات خطاهایی را در رمزگذاری های حرکت می بینم.
اولین عبارت استثنا برای این است که اگر حرکتی نادیده گرفته شود ( پس برنامه فکر می کند نوبت اشتباه است). اگر این اتفاق بیفتد، رمزگذاری کار نخواهد کرد، پس عبارت استثنا، چرخش را تغییر میدهد و دوباره تلاش میکند. این بهینه ترین کد نیست، اما رمزگذاری بخش کوچکی از کل زمان اجرای ایجاد یک موتور شطرنج هوش مصنوعی است و پس قابل قبول است.
مطمئن شوید که ساختار پوشه درستی دارید و تمام پوشه های مختلف را ایجاد کرده اید. در غیر این صورت یک خطا دریافت خواهید کرد.
اکنون صفحه شطرنج و حرکات خود را رمزگذاری کرده اید. اگر می خواهید، می توانید کد کامل این قسمت را در GitHub من تحلیل کنید.
قسمت ۳: چگونه مدل هوش مصنوعی را آموزش دهیم
این سومین و آخرین بخش در ساخت موتور شطرنج هوش مصنوعی شماست!
در قسمت ۱ یاد گرفتید که چگونه یک مجموعه داده ایجاد کنید و در قسمت ۲ به رمزگذاری مجموعه داده نگاه کردید تا بتوان از آن برای یک هوش مصنوعی استفاده کرد.
اکنون از این مجموعه داده کدگذاری شده برای آموزش هوش مصنوعی خود با استفاده از PyTorch استفاده خواهید کرد!
نحوه وارد کردن بسته ها
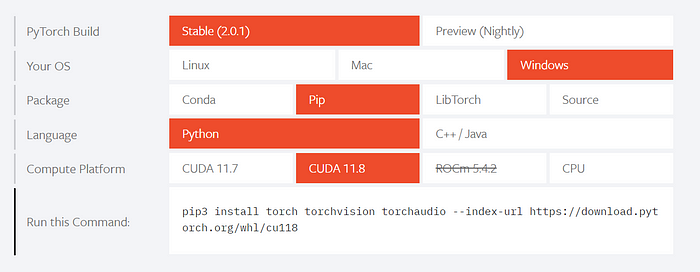
مثل همیشه، تمام وارداتی که در آموزش استفاده خواهد شد را دارید. بیشتر آنها ساده هستند، اما شما باید PyTorch را نصب کنید، که توصیه می کنم با استفاده از این وب سایت نصب کنید.
در اینجا میتوانید کمی به پایین اسکرول کنید، جایی که برخی از گزینهها را میبینید که از چه ساخت و سیستم عاملی استفاده میکنید.
پس از انتخاب گزینه هایی که برای شما اعمال می شود، کدی دریافت خواهید کرد که می توانید برای نصب PyTorch در ترمینال قرار دهید.
گزینه هایی را که انتخاب کردم در تصویر زیر مشاهده می کنید، اما به طور کلی توصیه می کنم از ساخت پایدار استفاده کنید و سیستم عامل خود را انتخاب کنید.
سپس، بسته ای را که بیشتر به آن عادت دارید انتخاب کنید (Conda یا pip احتمالاً ساده ترین است زیرا می توانید آن را در ترمینال قرار دهید).
CUDA 11.7/11.8 را انتخاب کنید (مهم نیست کدام یک) و با استفاده از دستور داده شده در پایین نصب کنید.
سپس می توانید تمام بسته های خود را با کد زیر وارد کنید:
import numpy as np import torch import torch.nn as nn import torch.functional as F import torchvision import torchvision.transforms as transforms from torch.utils.tensorboard import SummaryWriter from datetime import datetime import gym import gym_chess import os import chess from tqdm import tqdm from gym_chess.alphazero.move_encoding import utils from pathlib import Path from typing import Optionalنحوه نصب CUDA
این یک مرحله اختیاری است که به شما امکان می دهد از پردازنده گرافیکی خود برای آموزش سریعتر مدل خود استفاده کنید. نیازی به این کار نیست، اما در زمان آموزش هوش مصنوعی در زمان شما صرفه جویی می کند.
نحوه نصب CUDA بسته به سیستم عامل شما متفاوت است، اما من از ویندوز استفاده می کنم و این آموزش را دنبال کردم.
اگر از MacOS یا لینوکس استفاده میکنید، میتوانید با جستجو کردن در گوگل، آموزش «نصب CUDA Mac/Linux» را پیدا کنید.
برای تحلیل اینکه آیا CUDA در دسترس دارید (GPU شما در دسترس است)، می توانید از این کد استفاده کنید:
#check if cuda available torch.cuda.is_available() اگر پردازنده گرافیکی شما در دسترس باشد، خروجی آن True . با این حال، اگر پردازنده گرافیکی در دسترس ندارید، نگران نباشید، تنها نقطه ضعف در اینجا این است که آموزش مدل بیشتر طول می کشد، که هنگام انجام پروژه های سرگرمی مانند این کار چندان مهمی نیست.
نحوه ایجاد روش های رمزگذاری
سپس چند روش کمکی برای رمزگذاری و رمزگشایی از بسته Python Gym-Chess تعریف می کنم.
مجبور شدم تغییراتی در بسته ایجاد کنم تا کار کند. بیشتر کدها از بسته کپی می شوند، فقط با چند ترفند کوچک باعث می شود کد به کلاس و غیره وابسته نباشد.
توجه داشته باشید که لازم نیست تمام کدهای زیر را درک کنید، زیرا روشی که Deepmind تمام حرکات را در شطرنج رمزگذاری می کند، پیچیده است.
#helper methods: #decoding moves from idx to uci notation def _decodeKnight(action: int) -> Optional[chess.Move]: _NUM_TYPES: int = 8 #: Starting point of knight moves in last dimension of 8 x 8 x 73 action array. _TYPE_OFFSET: int = 56 #: Set of possible directions for a knight move, encoded as #: (delta rank, delta square). _DIRECTIONS = utils.IndexedTuple( (+2, +1), (+1, +2), (-1, +2), (-2, +1), (-2, -1), (-1, -2), (+1, -2), (+2, -1), ) from_rank, from_file, move_type = np.unravel_index(action, (8, 8, 73)) is_knight_move = ( _TYPE_OFFSET <= move_type and move_type < _TYPE_OFFSET + _NUM_TYPES ) if not is_knight_move: return None knight_move_type = move_type - _TYPE_OFFSET delta_rank, delta_file = _DIRECTIONS[knight_move_type] to_rank = from_rank + delta_rank to_file = from_file + delta_file move = utils.pack(from_rank, from_file, to_rank, to_file) return move def _decodeQueen(action: int) -> Optional[chess.Move]: _NUM_TYPES: int = 56 # = 8 directions * 7 squares max. distance #: Set of possible directions for a queen move, encoded as #: (delta rank, delta square). _DIRECTIONS = utils.IndexedTuple( (+1, 0), (+1, +1), ( 0, +1), (-1, +1), (-1, 0), (-1, -1), ( 0, -1), (+1, -1), ) from_rank, from_file, move_type = np.unravel_index(action, (8, 8, 73)) is_queen_move = move_type < _NUM_TYPES if not is_queen_move: return None direction_idx, distance_idx = np.unravel_index( indices=move_type, shape=(8,7) ) direction = _DIRECTIONS[direction_idx] distance = distance_idx + 1 delta_rank = direction[0] * distance delta_file = direction[1] * distance to_rank = from_rank + delta_rank to_file = from_file + delta_file move = utils.pack(from_rank, from_file, to_rank, to_file) return move def _decodeUnderPromotion(action): _NUM_TYPES: int = 9 # = 3 directions * 3 piece types (see below) #: Starting point of underpromotions in last dimension of 8 x 8 x 73 action #: array. _TYPE_OFFSET: int = 64 #: Set of possibel directions for an underpromotion, encoded as file delta. _DIRECTIONS = utils.IndexedTuple( -1, 0, +1, ) #: Set of possibel piece types for an underpromotion (promoting to a queen #: is implicitly encoded by the corresponding queen move). _PROMOTIONS = utils.IndexedTuple( chess.KNIGHT, chess.BISHOP, chess.ROOK, ) from_rank, from_file, move_type = np.unravel_index(action, (8, 8, 73)) is_underpromotion = ( _TYPE_OFFSET <= move_type and move_type < _TYPE_OFFSET + _NUM_TYPES ) if not is_underpromotion: return None underpromotion_type = move_type - _TYPE_OFFSET direction_idx, promotion_idx = np.unravel_index( indices=underpromotion_type, shape=(3,3) ) direction = _DIRECTIONS[direction_idx] promotion = _PROMOTIONS[promotion_idx] to_rank = from_rank + 1 to_file = from_file + direction move = utils.pack(from_rank, from_file, to_rank, to_file) move.promotion = promotion return move #primary decoding function, the ones above are just helper functions def decodeMove(action: int, board) -> chess.Move: move = _decodeQueen(action) is_queen_move = move is not None if not move: move = _decodeKnight(action) if not move: move = _decodeUnderPromotion(action) if not move: raise ValueError(f"{action} is not a valid action") # Actions encode moves from the perspective of the current player. If # this is the black player, the move must be reoriented. turn = board.turn if turn == False: #black to move move = utils.rotate(move) # Moving a pawn to the opponent's home rank with a queen move # is automatically assumed to be queen underpromotion. However, # since queenmoves has no reference to the board and can thus not # determine whether the moved piece is a pawn, you have to add this # information manually here if is_queen_move: to_rank = chess.square_rank(move.to_square) is_promoting_move = ( (to_rank == 7 and turn == True) or (to_rank == 0 and turn == False) ) piece = board.piece_at(move.from_square) if piece is None: #NOTE I added this, not entirely sure if it's correct return None is_pawn = piece.piece_type == chess.PAWN if is_pawn and is_promoting_move: move.promotion = chess.QUEEN return move def encodeBoard(board: chess.Board) -> np.array: """Converts a board to numpy array representation.""" array = np.zeros((8, 8, 14), dtype=int) for square, piece in board.piece_map().items(): rank, file = chess.square_rank(square), chess.square_file(square) piece_type, color = piece.piece_type, piece.color # The first six planes encode the pieces of the active player, # the following six those of the active player's opponent. Since # this class always stores boards oriented towards the white player, # White is considered to be the active player here. offset = 0 if color == chess.WHITE else 6 # Chess enumerates piece types beginning with one, which you have # to account for idx = piece_type - 1 array[rank, file, idx + offset] = 1 # Repetition counters array[:, :, 12] = board.is_repetition(2) array[:, :, 13] = board.is_repetition(3) return arrayنحوه بارگذاری داده ها
در قسمت ۱، چند بازی شطرنج را استخراج کردید، و سپس در قسمت ۲، آن را رمزگذاری کردید تا بتوان از آن برای آموزش یک مدل استفاده کرد.
شما اکنون این داده ها را در اشیاء بارگذار داده PyTorch بارگیری می کنید، پس برای آموزش مدل در دسترس است. اگر قسمت ۱ یا ۲ این آموزش را انجام نداده اید، می توانید چند فایل آموزشی آماده را در این پوشه Google Drive پیدا کنید.
ابتدا چند فراپارامتر را تعریف کنید:
FRACTION_OF_DATA = 1 BATCH_SIZE = 4 متغیر FRACTION_OF_DATA فقط در صورتی وجود دارد که بخواهید مدل را سریع آموزش دهید و نخواهید آن را بر روی مجموعه داده کامل آموزش دهید. مطمئن شوید که این مقدار > 0 و ≤ ۱ باشد.
متغیر BATCH_SIZE اندازه دسته ای را که مدل آموزش می دهد تعیین می کند. به طور کلی، اندازه دستهای بالاتر به این معنی است که مدل میتواند سریعتر تمرین کند، اما اندازه دسته شما توسط قدرت GPU شما محدود میشود.
من توصیه میکنم با سایز کم دسته ۴ تست کنید و سپس سعی کنید آن را افزایش دهید و ببینید که آیا آموزش همچنان همانطور که باید کار میکند یا خیر. اگر یک نوع خطای حافظه را دریافت کردید، دوباره اندازه دسته را کاهش دهید.
سپس داده ها را با کد زیر بارگذاری می کنید. مطمئن شوید که ساختار پوشه و نام فایل شما در اینجا صحیح است. شما باید یک پوشه داده اولیه در همان جایی که کد شما قرار دارد داشته باشید.
سپس در داخل این پوشه داده، باید یک پوشه preparedData داشته باشید که حاوی فایلهایی است که میخواهید روی آنها آموزش دهید. این فایل ها باید moves{i}.npy و positions{i}.npy نامیده شوند، جایی که i نمایه فایل است. اگر فایل ها را مانند قبل کدگذاری کرده اید، همه چیز باید درست باشد.
#dataset #loading training data allMoves = [] allBoards = [] files = os.listdir('data/preparedData') numOfEach = len(files) // 2 # half are moves, other half are positions for i in range(numOfEach): try: moves = np.load(f"data/preparedData/moves{i}.npy", allow_pickle=True) boards = np.load(f"data/preparedData/positions{i}.npy", allow_pickle=True) if (len(moves) != len(boards)): print("ERROR ON i = ", i, len(moves), len(boards)) allMoves.extend(moves) allBoards.extend(boards) except: print("error: could not load ", i, ", but is still going") allMoves = np.array(allMoves)[:(int(len(allMoves) * FRACTION_OF_DATA))] allBoards = np.array(allBoards)[:(int(len(allBoards) * FRACTION_OF_DATA))] assert len(allMoves) == len(allBoards), "MUST BE OF SAME LENGTH" #flatten out boards # allBoards = allBoards.reshape(allBoards.shape[0], -1) trainDataIdx = int(len(allMoves) * 0.8) #NOTE transfer all data to GPU if available device = torch.device("cuda:0" if torch.cuda.is_available() else "cpu") allBoards = torch.from_numpy(np.asarray(allBoards)).to(device) allMoves = torch.from_numpy(np.asarray(allMoves)).to(device) training_set = torch.utils.data.TensorDataset(allBoards[:trainDataIdx], allMoves[:trainDataIdx]) test_set = torch.utils.data.TensorDataset(allBoards[trainDataIdx:], allMoves[trainDataIdx:]) # Create data loaders for your datasets; shuffle for training, not for validation training_loader = torch.utils.data.DataLoader(training_set, batch_size=BATCH_SIZE, shuffle=True) validation_loader = torch.utils.data.DataLoader(test_set, batch_size=BATCH_SIZE, shuffle=False)نحوه تعریف مدل یادگیری عمیق
سپس می توانید معماری مدل را تعریف کنید:
class Model(torch.nn.Module): def __init__(self): super(Model, self).__init__() self.INPUT_SIZE = 896 # self.INPUT_SIZE = 7*7*13 #NOTE changing input size for using cnns self.OUTPUT_SIZE = 4672 # = number of unique moves (action space) #can try to add CNN and pooling here (calculations taking into account spacial features) #input shape for sample is (8,8,14), flattened to 1d array of size 896 # self.cnn1 = nn.Conv3d(4,4,(2,2,4), padding=(0,0,1)) self.activation = torch.nn.ReLU() self.linear1 = torch.nn.Linear(self.INPUT_SIZE, 1000) self.linear2 = torch.nn.Linear(1000, 1000) self.linear3 = torch.nn.Linear(1000, 1000) self.linear4 = torch.nn.Linear(1000, 200) self.linear5 = torch.nn.Linear(200, self.OUTPUT_SIZE) self.softmax = torch.nn.Softmax(1) #use softmax as prob for each move, dim 1 as dim 0 is the batch dimension def forward(self, x): #x.shape = (batch size, 896) x = x.to(torch.float32) # x = self.cnn1(x) #for using cnns x = x.reshape(x.shape[0], -1) x = self.linear1(x) x = self.activation(x) x = self.linear2(x) x = self.activation(x) x = self.linear3(x) x = self.activation(x) x = self.linear4(x) x = self.activation(x) x = self.linear5(x) # x = self.softmax(x) #do not use softmax since you are using cross entropy loss return x def predict(self, board : chess.Board): """takes in a chess board and returns a chess.move object. NOTE: this function should definitely be written better, but it works for now""" with torch.no_grad(): encodedBoard = encodeBoard(board) encodedBoard = encodedBoard.reshape(1, -1) encodedBoard = torch.from_numpy(encodedBoard) res = self.forward(encodedBoard) probs = self.softmax(res) probs = probs.numpy()[0] #do not want tensor anymore, 0 since it is a 2d array with 1 row #verify that move is legal and can be decoded before returning while len(probs) > 0: #try max 100 times, if not throw an error moveIdx = probs.argmax() try: #TODO should not have try here, but was a bug with idx 499 if it is black to move uciMove = decodeMove(moveIdx, board) if (uciMove is None): #could not decode probs = np.delete(probs, moveIdx) continue move = chess.Move.from_uci(str(uciMove)) if (move in board.legal_moves): #if legal, return, else: loop continues after deleting the move return move except: pass probs = np.delete(probs, moveIdx) #TODO probably better way to do this, but it is not too time critical as it is only for predictions #remove the move so its not chosen again next iteration #TODO can return random move here as well! return None #if no legal moves found, return NoneYou are free to change the architecture however you like.
Here, I have just chosen some simple parameters that worked decently, though there is room for improvement. Some examples of changes you can make are:
Add PyTorch CNN modules (remember to not flatten the array before adding these)
Change the activation functions in hidden layers. I am now using ReLU , but this could be changed to for example Sigmoid or Tanh, which you can read more about here .
Change the number of hidden layers. When changing this, you must remember to add an activation function between each layer in the forward() function.
Change the number of neurons in each hidden layer. If you are going to change the number of neurons, you must remember the rule that the number of neurons out in layer n, should be the neurons in, in layer n+1. So for example, linear1 takes in 1000 neurons, and outputs 2000 neurons. Then linear2 must take in 2000 neurons. You can then freely choose the number of output neurons on linear2, but the amount must match the number of input neurons in linear 3, and so on. The input to layer 1 and the output from the last layer however are set with the parameters INPUT_SIZE , and OUTPUT_SIZE .
In addition to the model architecture and forward functions, which are obligatory when creating a deep model, I also defined a predict() function, to make it easier to give a chess position to the model, and then it outputs the move it recommends.
How to train the model
When you have all the required data and the model is defined, you can begin training the model. First, you define a function to train one epoch and save the best model:
#helper functions for training def train_one_epoch(model, optimizer, loss_fn, epoch_index, tb_writer): running_loss = 0. last_loss = 0. # Here, you use enumerate(training_loader) instead of # iter(training_loader) so that you can track the batch # index and do some intra-epoch reporting for i, data in enumerate(training_loader): # Every data instance is an input + label pair inputs, labels = data # Zero your gradients for every batch! optimizer.zero_grad() # Make predictions for this batch outputs = model(inputs) # Compute the loss and its gradients loss = loss_fn(outputs, labels) loss.backward() # Adjust learning weights optimizer.step() # Gather data and report running_loss += loss.item() if i % 1000 == 999: last_loss = running_loss / 1000 # loss per batch # print(' batch {} loss: {}'.format(i + 1, last_loss)) tb_x = epoch_index * len(training_loader) + i + 1 tb_writer.add_scalar('Loss/train', last_loss, tb_x) running_loss = 0. return last_loss #the 3 functions below help store the best model you have created yet def createBestModelFile(): #first find best model if it exists: folderPath = Path('./savedModels') if (not folderPath.exists()): os.mkdir(folderPath) path = Path('./savedModels/bestModel.txt') if (not path.exists()): #create the files f = open(path, "w") f.write("10000000") #set to high number so it is overwritten with better loss f.write("\ntestPath") f.close() def saveBestModel(vloss, pathToBestModel): f = open("./savedModels/bestModel.txt", "w") f.write(str(vloss.item())) f.write("\n") f.write(pathToBestModel) print("NEW BEST MODEL FOUND WITH LOSS:", vloss) def retrieveBestModelInfo(): f = open('./savedModels/bestModel.txt', "r") bestLoss = float(f.readline()) bestModelPath = f.readline() f.close() return bestLoss, bestModelPathNote that this function is essentially copied from the PyTorch docs , with a slight change by importing the model, optimizer, and loss function as function parameters.
You then define the hyperparameters like below. Note that this is something you can tune, to further improve your model.
#hyperparameters EPOCHS = 60 LEARNING_RATE = 0.001 MOMENTUM = 0.9Run the training with the code below:
#run training createBestModelFile() bestLoss, bestModelPath = retrieveBestModelInfo() timestamp = datetime.now().strftime('%Y%m%d_%H%M%S') writer = SummaryWriter('runs/fashion_trainer_{}'.format(timestamp)) epoch_number = 0 model = Model() loss_fn = torch.nn.CrossEntropyLoss() optimizer = torch.optim.SGD(model.parameters(), lr=LEARNING_RATE, momentum=MOMENTUM) device = torch.device("cuda:0" if torch.cuda.is_available() else "cpu") model.to(device) best_vloss = 1_000_000. for epoch in tqdm(range(EPOCHS)): if (epoch_number % 5 == 0): print('EPOCH {}:'.format(epoch_number + 1)) # Make sure gradient tracking is on, and do a pass over the data model.train(True) avg_loss = train_one_epoch(model, optimizer, loss_fn, epoch_number, writer) running_vloss = 0.0 # Set the model to evaluation mode, disabling dropout and using population # statistics for batch normalization. model.eval() # Disable gradient computation and reduce memory consumption. with torch.no_grad(): for i, vdata in enumerate(validation_loader): vinputs, vlabels = vdata voutputs = model(vinputs) vloss = loss_fn(voutputs, vlabels) running_vloss += vloss avg_vloss = running_vloss / (i + 1) #only print every 5 epochs if epoch_number % 5 == 0: print('LOSS train {} valid {}'.format(avg_loss, avg_vloss)) # Log the running loss averaged per batch # for both training and validation writer.add_scalars('Training vs. Validation Loss', { 'Training' : avg_loss, 'Validation' : avg_vloss }, epoch_number + 1) writer.flush() # Track best performance, and save the model's state if avg_vloss < best_vloss: best_vloss = avg_vloss if (bestLoss > best_vloss): #if better than previous best loss from all models created, save it model_path = 'savedModels/model_{}_{}'.format(timestamp, epoch_number) torch.save(model.state_dict(), model_path) saveBestModel(best_vloss, model_path) epoch_number += 1 print("\n\nBEST VALIDATION LOSS FOR ALL MODELS: ", bestLoss)This code is also heavily inspired by the PyTorch docs.
Depending on the number of layers in your model, the number of neurons in the layers, the number of epochs, if you are using GPU or not, and several other factors, your time to train the model can take anywhere from seconds, to several hours.
As you can see below, the estimated time to train my model here was about 2 minutes.
How to test your model
Testing your model is a vital part of checking if what you created works. I have implemented two ways of checking the model:
Yourself vs AI
The first way is to play yourself against the AI. Here you decide a move, then you let the AI decide the move, and so on. I recommend doing this in a notebook, so you can run different cells for different actions.
First, load a model that was saved from training. Here, I get the path to the file from the file created when running training, that stores the path to your best model. You can of course also manually change the path to the model you prefer to use.
saved_model = Model() #load best model path from your file f = open("./savedModels/bestModel.txt", "r") bestLoss = float(f.readline()) model_path = f.readline() f.close() model.load_state_dict(torch.load(model_path))Then, define the chess board:
#play your own game board = chess.Board()Then you can make a move by running the code in the cell below by changing the string in the first line. Make sure it is a legal move:
moveStr = "e2e4" move = chess.Move.from_uci(moveStr) board.push(move)Then you can let the AI decide the next move with the cell below:
#make ai move: aiMove = saved_model.predict(board) board.push(aiMove) boardThis will also print the board state so you can decide your own move more easily:

Continue making every other move, let the AI play every other move, and see who wins!
If you want to regret a move, you can use:
#regret move: board.pop()Stockfish vs your AI
You can also automate the testing process, by setting Stockfish to a specific ELO, and letting your AI play against it:
First, load your model (make sure to change the model_path to your own model):
saved_model = Model() model_path = "savedModels/model_20230702_150228_46" #TODO CHANGE THIS PATH model.load_state_dict(torch.load(model_path))Then import Stockfish, and set it to a specific ELO. Remember to change the path to the Stockfish engine to your own path where you have the Stockfish program):
# test elo against stockfish ELO_RATING = 500 from stockfish import Stockfish #TODO CHANGE PATH BELOW stockfish = Stockfish(path=r"C:\Users\eivin\Documents\ownProgrammingProjects18062023\ChessEngine\stockfish\stockfish\stockfish-windows-2022-x86-64-avx2") stockfish.set_elo_rating(ELO_RATING)A 100 ELO rating is quite bad, and something your engine will hopefully beat.
Then play the game with this script, which will run:
board = chess.Board() allMoves = [] #list of strings for saving moves for setting pos for stockfish MAX_NUMBER_OF_MOVES = 150 for i in range(MAX_NUMBER_OF_MOVES): #set a limit for the game #first my ai move try: move = saved_model.predict(board) board.push(move) allMoves.append(str(move)) #add so stockfish can see except: print("game over. You lost") break # #then get stockfish move stockfish.set_position(allMoves) stockfishMove = stockfish.get_best_move_time(3) allMoves.append(stockfishMove) stockfishMove = chess.Move.from_uci(stockfishMove) board.push(stockfishMove) stockfish.reset_engine_parameters() #reset elo rating boardWhich will print the board position after the game is over.

Reflection on the performance of the chess engine
I tried training the model on about 100k positions and moves and discovered that the performance of the model still is not enough to beat a low-level (500 ELO) chess bot.
There could be several reasons for this. Chess is a highly complicated game, that probably requires a lot more moves and positions for a decent bot to be developed.
Furthermore, there are several elements of the bot you change potentially change to improve it. The architecture can be improved, for example by adding a CNN at the beginning of the forward function, so that the bot takes in spatial information.
You can also change the number of hidden layers in the fully connected layers, or the amount of neurons in each layer.
A safe way to further improve the model is to feed it more data, as you have access to an infinite amount of data by using the mining code in this article .
Additionally, I think this shows that an imitation learning chess engine either needs a lot of data or training a chess engine solely from imitation learning might not be an optimal idea.
Still, imitation learning can be used as part of a chess engine, for example, if you also implement traditional searching methods, and add imitation learning on top of it.
نتیجه
تبریک میگم You have now made your own AI chess engine from scratch, and I hope you learned something along the way. You can constantly make this engine better if you want to improve it, and make sure it beats better and better competition.
If you want to full code, check out my GitHub .
This tutorial was originally written part by part on my Medium, you can check out each part here:
P art 1 : Generating the dataset
Part 2 : Encoding with the AlphaZero method
Part 3 : Training the model
If you are interested and want to learn more about similar topics, you can find me on:
برچسبها
|
|


ارسال نظر